ABAC & Feature Flagging - Custom User Experience
This tutorial will guide you through setting up ABAC (Attribute-based Access Control) policies with Permit and show you how to create a custom user experience. This depends on who's logged in, their role, and the specific rules (or attributes) set for that role, making permissions more granular and specific.
The approach is useful in cases where you're adding new features to your system and want to make them available only to a select group of test users. It’s also common to use this method when you have paying customers, adjusting their app experience based on their status and even location, ensuring a tailored and strategically guided user journey.
What we will build
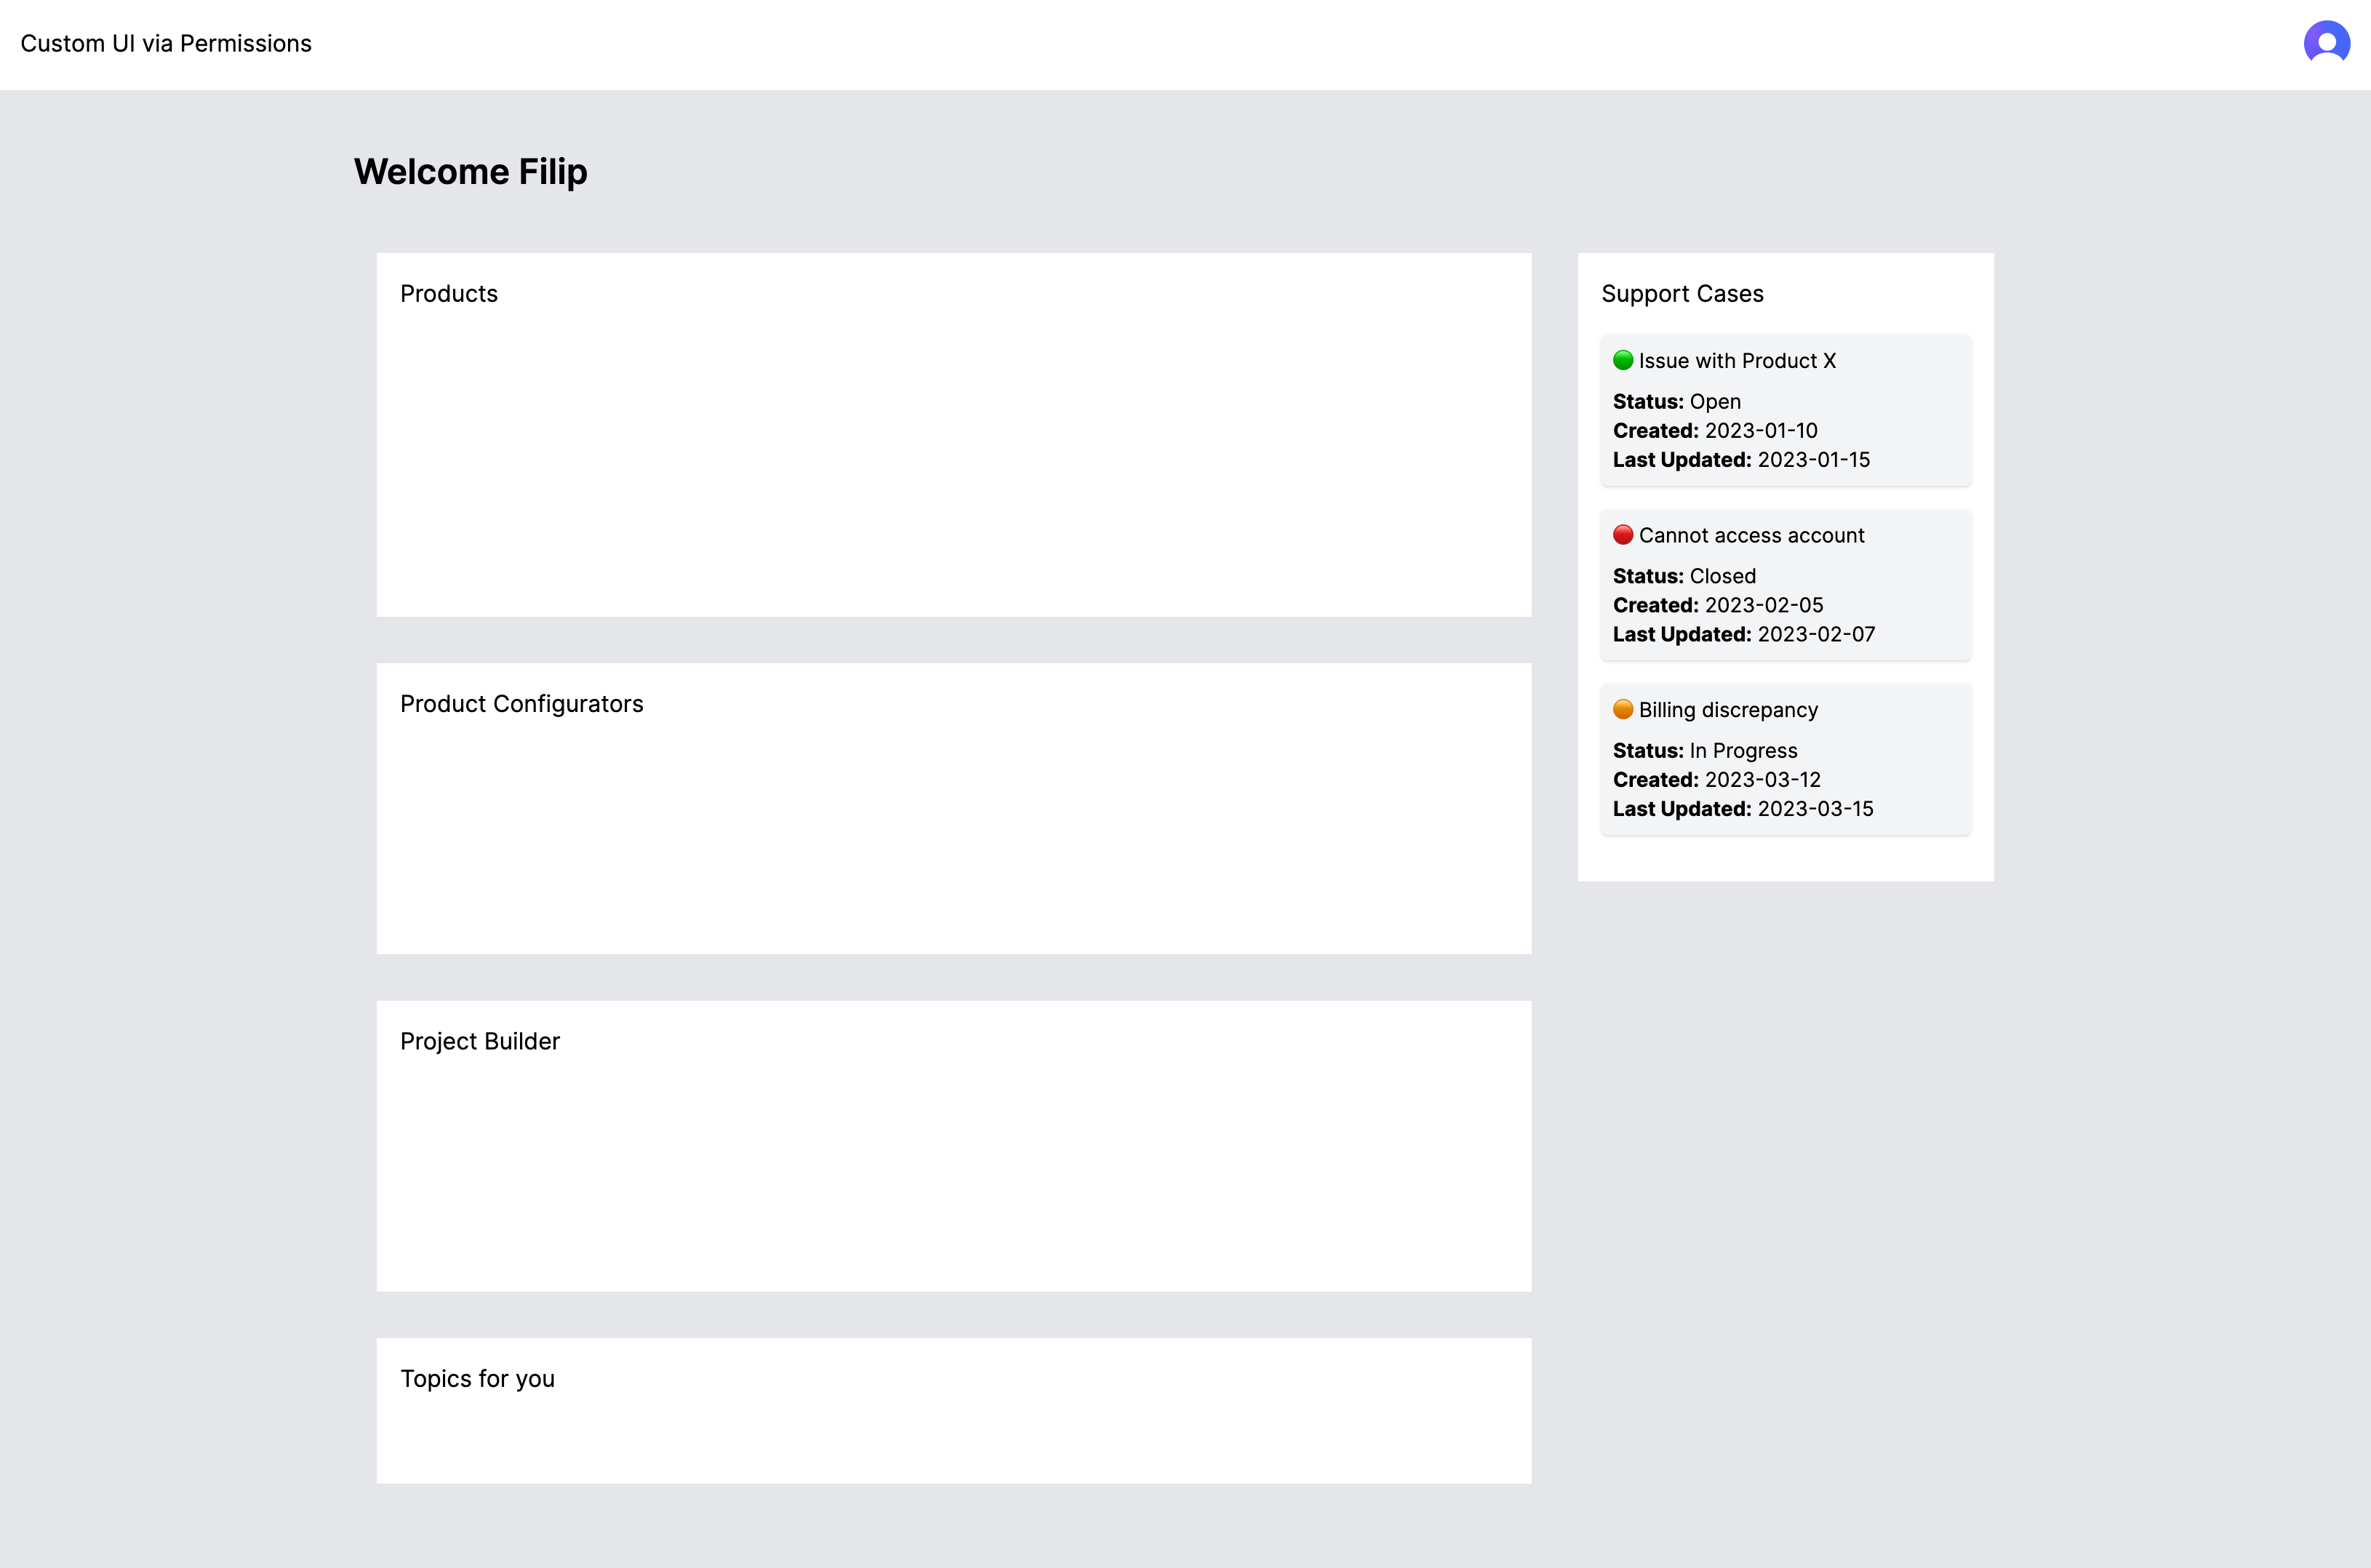
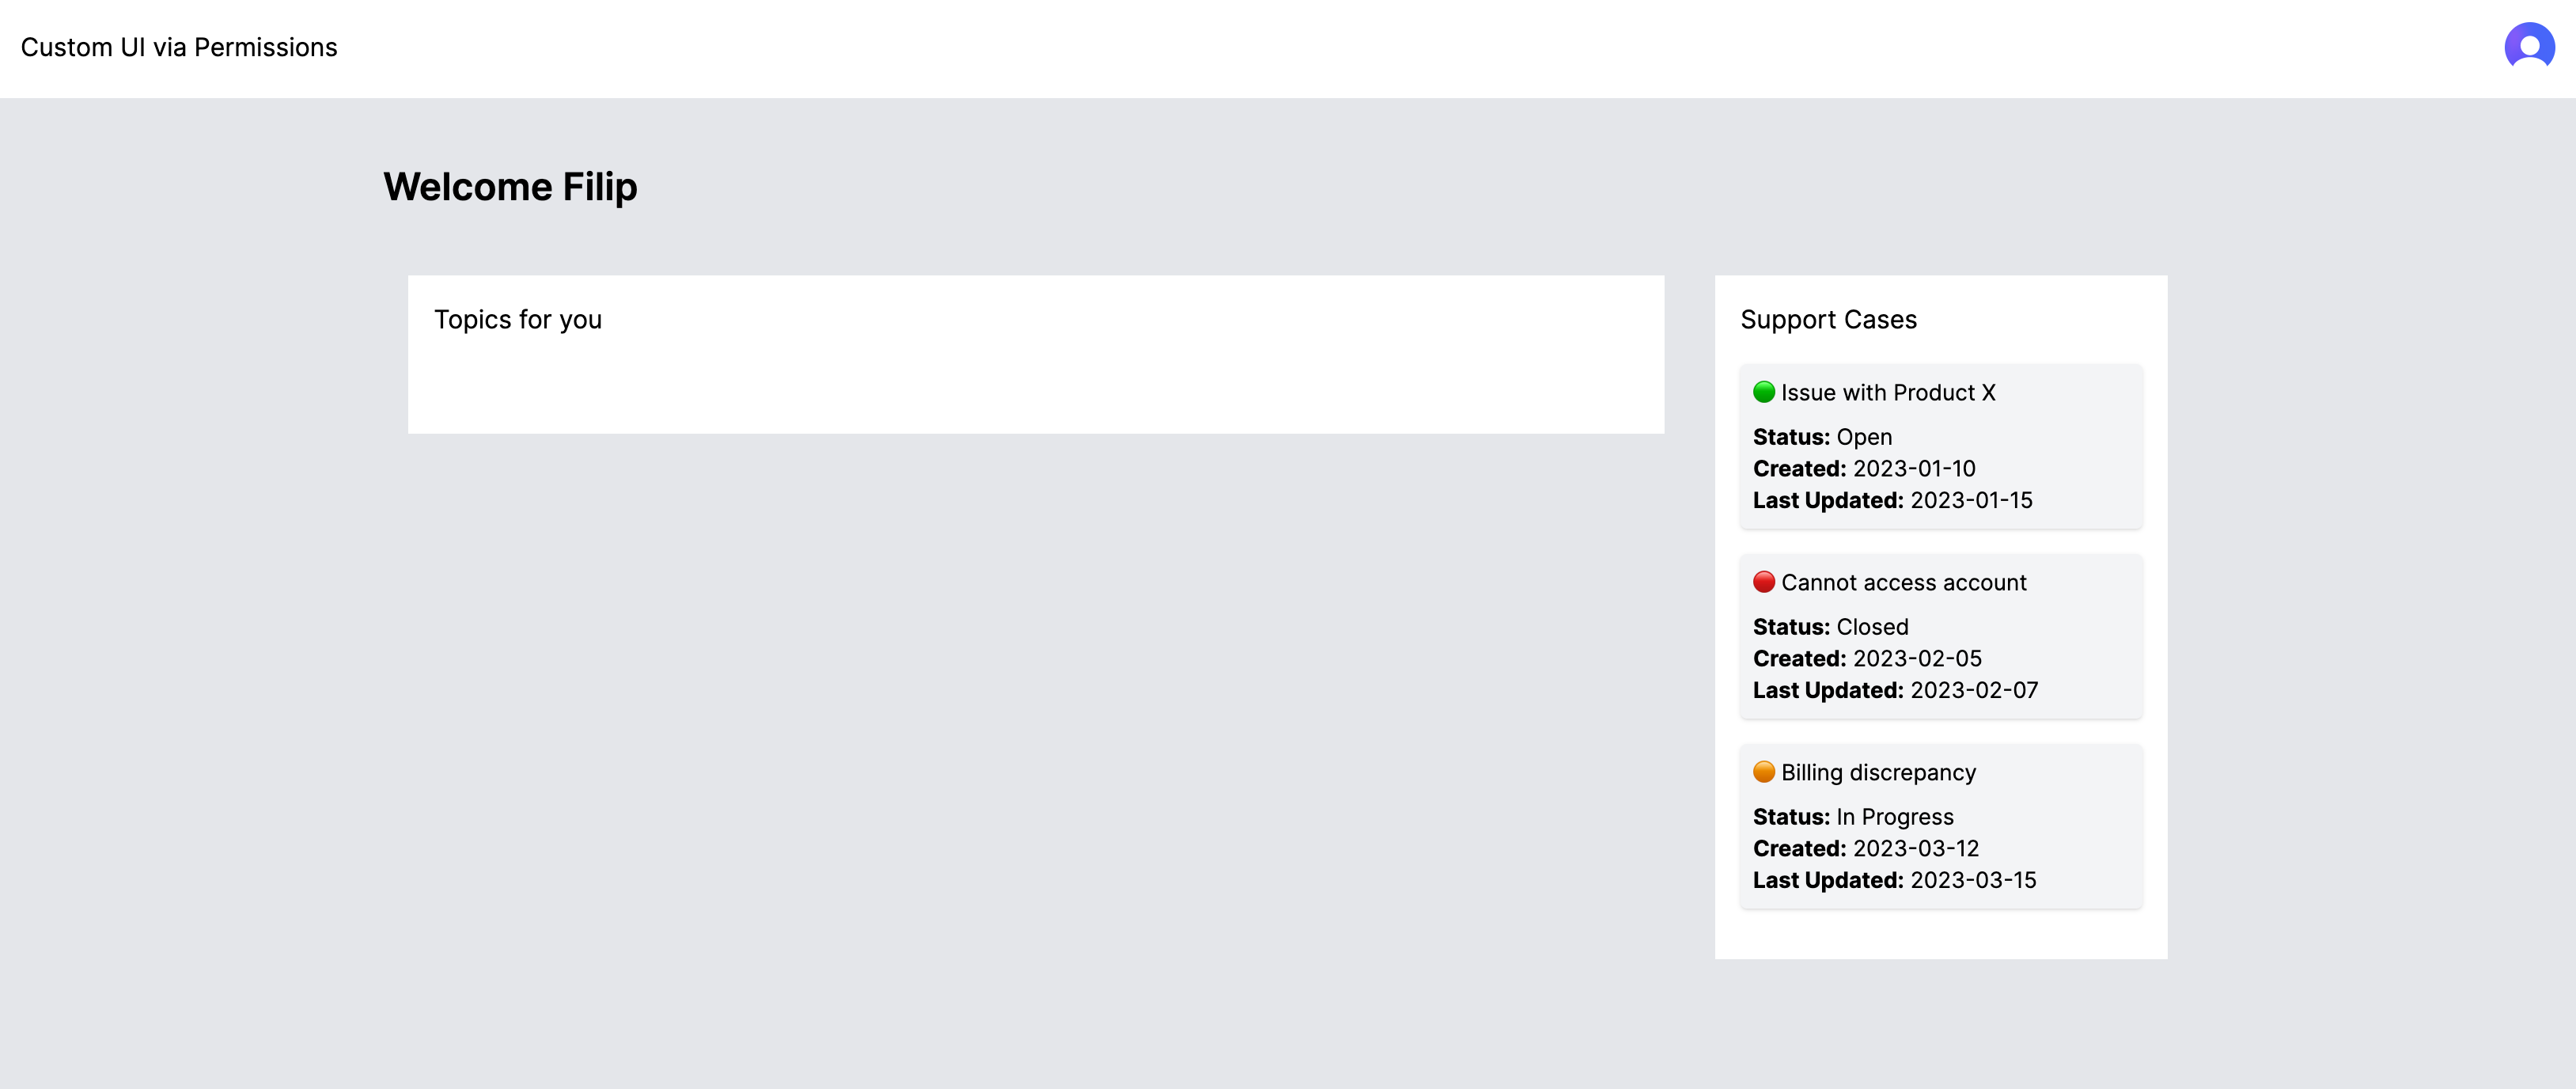
In this project, we'll create an app that displays specific tiles according to the user's role and the permissions they have. The app will not only consider resources but also the attributes related to those resources, ensuring a finely tuned enforcement of permissions.
The dashboard will dynamically load pertinent tiles, considering factors like the user's country and the sales channel to which they belong.
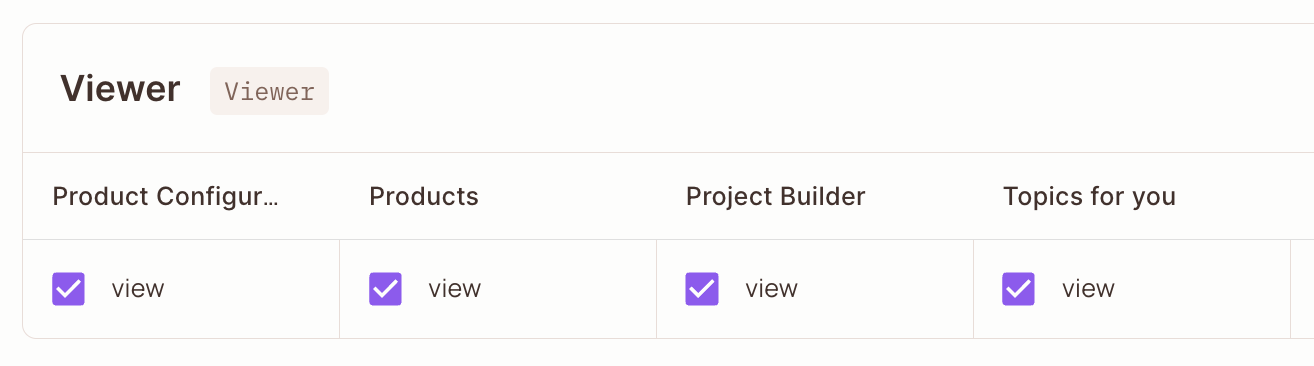
UI example with all permissions enabled
The UI
The Permit Policy
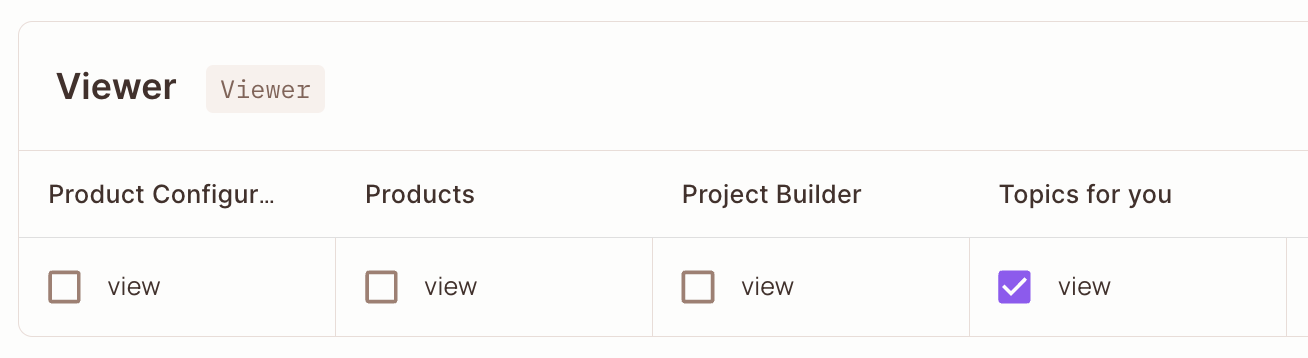
UI example with some permissions enabled
The UI
The Permit Policy
Prerequisites
Before embarking on this project, ensure you have the following prerequisites in place:
- An account with Permit
- A properly configured PDP (Policy Decision Point) with the correct API Key
- The Permit SDK package installed
- An authentication provider of your choosing (we support them all)
- A basic app where you'll enforce permissions and adjust the UI. For this demo, you can clone a nextjs/react boilerplate starter.
Modeling basic roles and resources
Defining attributes
Creating Resource Sets
Enforcing permissions with permit.check()
Rendering UI based on permissions
The below guide is a swift implementation of what needs to be done to get CASL to render our components based on this example project. If you want to go into more details about what CASL is and how it works, check out our in-depth guide here.
Creating an API endpoint to handle permission checks
As part of the CASL component that we will be creating later in this guide, we will need to specify an API
route that we can call, which will perform bulk permit.check() operations for us, returning the result for
each.
Here is a basic implementation of such endpoint, which we have under /api/something. You can name the file
as you wish.
import { Permit } from "permitio";

const permit = new Permit({
  token: "YOUR_PERMIT_API_KEY",
  pdp: "http://localhost:7766",
});

export default async function handler(req, res) {
  try {
    const { user: userId, action, resource } = req.query;

    if (!userId) {
      return res.status(400).json({ error: "No User Id" });
    }

    if (!action || !resource) {
      return res.status(400).json({ error: "Missing action or resource" });
    }

    const allowed = await permit.check(userId, action, resource);

    if (!allowed) {
      return res.status(403).json({ error: "Not allowed" });
    }

    return res.json({ permitted: allowed });
  } catch (error) {
    return res.status(500).json({ error: "Internal Server Error" });
  }
}
Pay attention that we have imported the Permit library and we initialized the Permit object. You can follow this guide to understand where to fetch your API key from.
Once we are done with this step, we need to make sure pull and launch our PDP - you can also find the steps on how to do this here.
Creating the AbilityLoader
The AbilityLoader component is integral to this setup, diligently working to asynchronously retrieve and establish user-specific permissions, particularly upon user sign-in.
In this scenario, we're employing Clerk.com as our authentication provider to obtain the userId, which we have synchronized with Permit. This allows us to identify the currently logged-in user and correlate them with the associated policy for their role. It's crucial to highlight that you can choose any authentication provider that best fits your needs—Permit is designed to integrate seamlessly with all of them.
import React, { createContext, useEffect, useState } from "react";
import { useUser } from "@clerk/nextjs";
import { Ability } from "@casl/ability";
import { Permit, permitState } from "permit-fe-sdk";

// Create Context
export const AbilityContext = createContext();

export const AbilityLoader = ({ children }) => {
  const { isSignedIn, user } = useUser();
  const [ability, setAbility] = useState(undefined);

  useEffect(() => {
    const getAbility = async (loggedInUser) => {
      const permit = Permit({
        loggedInUser: loggedInUser,
        backendUrl: "/api/something",
      });

      await permit.loadLocalState([
        { action: "view", resource: "Products" },
        { action: "view", resource: "document" },
        { action: "view", resource: "file" },
        { action: "view", resource: "component" },
      ]);

      const caslConfig = permitState.getCaslJson();

      return caslConfig && caslConfig.length ? new Ability(caslConfig) : undefined;
    };

    if (isSignedIn) {
      getAbility(user.id).then((caslAbility) => {
        setAbility(caslAbility);
      });
    }
  }, [isSignedIn, user]);

  return <AbilityContext.Provider value={ability}>{children}</AbilityContext.Provider>;
};
Conditionally rendering the UI
First of all, in the file where you want to render part of the UI based on a condition, make sure you import
permitState.
import { permitState } from "permit-fe-sdk";
Then, utilize permitState to render parts of the HTML.
<div className="flex h-full">
  <div className="flex flex-col flex-grow">
    {permitState?.check("view", "Products") && (
      <div className="bg-white m-4 p-4 h-[250px]">Products</div>
    )}
    {permitState?.check("view", "Product_Configurators") && (
      <div className="bg-white m-4 p-4 h-[200px]">Product Configurators</div>
    )}
    {permitState?.check("view", "Project_Builder") && (
      <div className="bg-white m-4 p-4 h-[200px]">Project Builder</div>
    )}
    {permitState?.check("view", "Topics_for_you") && (
      <div className="bg-white m-4 p-4 h-[100px]">Topics for you</div>
    )}
  </div>
</div>
Access to the finished project
If you want to play around with the finished project, you can find it here. Remember to replace the API keys with your own, both for Permit.io and Clerk.com.